The weight of your deck might surprise you. Once finished, with a group of people gathered on it for a party or a cookout, a deck could weigh thousands of pounds. Most homes have several continuous foundation walls to spread out the weight of the house on the ground, but your deck may only have a few vertical posts that concentrate the weight at the base of these posts. Because your deck footings transfer this load to the soil beneath the deck, the footings must be large and built with great diligence, or you risk future structural failings.
What is Deck Footing?
Deck footings are a particularly key part of deck construction because they supply a solid foundation that will support your deck. Your deck's design will decide how live and dead loads are transferred from different sections of the deck to concentrated points of contact with the ground. Live load is the weight of people, furniture, and other items on your finished deck, while dead loads refer to the weight of all components used to build the deck. The more footings your deck must distribute the total load, the less weight each footing will need to carry.
In effect, your footings act to spread the heavy load of the deck from the surface of a support post over a larger surface of the soil, so the ground can adequately support it. Without footings, deck support posts with a much smaller square inch surface area at their base than the larger footing could sink into the ground under the weight of the deck.
There are different kinds of footings, but in most cases, a deck footing is a cast or poured concrete pad that is below the soil line and in direct contact with solid compacted strong soil. Consult with your local building department who will decide which type of footing is allowed on your project.
While rare, a deck footing can also be made with a large slab of solid rock that's placed in the soil in lieu of poured concrete. The size of footings varies, but most are either 2-feet square or 2-feet in diameter. The thickness of a footing is normally 8 inches, although an engineer or architect may design a thicker one depending on the design of the deck and the strength of the soil.
Deck footings must be installed lower than the frost line in your area. Check with your local building department for requirements of fitting depth. The frost line is the point in the soil where your ground normally freezes during the winter. Placing the bottom of the footing several inches below the frost line prevents the deck from moving when the soil freezes in the winter.
Water expands in volume by 9 percent when it freezes. When the water in the soil freezes, it exerts an upward force that can easily lift thousands of pounds of weight. Should this force lift your deck up, it can cause a structural failure and, in rare cases, cause the deck to detach from a house and fall without warning.
A cast or poured concrete pier is often used as upright support to connect the buried footing pad to the structural post above grade. The top of this pier should be at least 4 inches above the soil level under the deck. Your local building department will decide the size, type, and depth of your footings.
Types of Deck Footings
There are several types of deck footings. The following four footings are the most common:
- Buried Post & Footing
- Tube Pier
- Bell Pier
- Pier & Footing
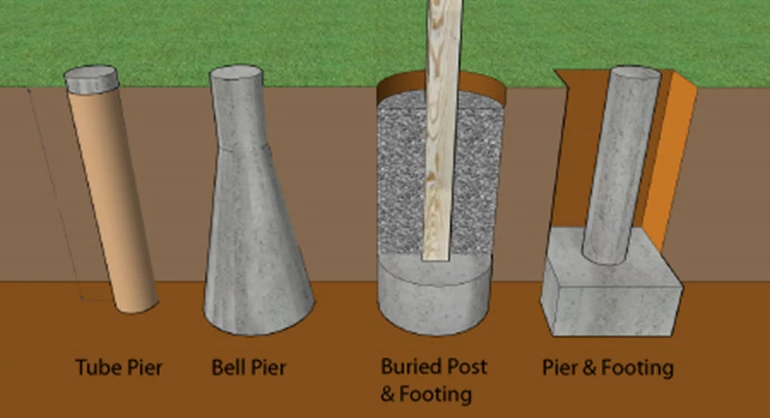
The buried post & footing is the most basic deck footing. The hole you dig doesn't have to be perfect; all that's important is the final 8 or 10 inches of excavation, which must be the required diameter of the footing.
Mix, then pour the concrete into the hole, level it, and finish it somewhat smoothly with a block of wood. While this deck footing is straightforward, be sure to check with your local building department to verify burying the post in the ground is allowed, even though the post may be rated for ground contact.\
The tube footing is one of the easiest to install. Check with your local building department to decide the proper tube footing diameter and depth for your project. It consists of a long cylinder of cast or poured concrete of the same diameter from top to bottom. The base of the tube footing must be on solid compacted soil and below the local frost line. It's always a good idea to excavate at least 4 inches below the local frost depth to be safe. Tube footing relies on the friction of the soil touching the sides of the pier to help support it and works best in soils with high clay content. Tube footings should be avoided in sandy soils. It's extremely important that the diameter of the tube pier be the same from the top to the bottom of the hole.
A bell pier is achieved by using a manufactured plastic form which is placed in the footing hole and filled with concrete. Bell piers offer several distinct advantages. As the pier gets deeper into the ground the diameter of the pier gets larger. This allows the weight of the deck above to be spread out over a greater amount of soil. The other advantage is a bell pier can resist, to a large degree, the upward lift force of frozen soil that is in contact with the upper parts of the pier. The larger bottom of the pier acts like a wedge anchor you might use in a masonry wall.
A pier & footing is advanced for a casual DIYer. It typically requires two separate concrete pours. The actual footing is poured first deep in the soil, then once the footing has achieved its first seta pier can be poured on top of the footing.
What to Consider Before You Dig Deck Footings
It is important to keep in mind that the utilities that serve your home could be buried directly under where a deck footing must go. These can include:
- Sewer lines
- Water lines
- Gas lines
- Electric lines
- Secondary electric or gas lines to a shed, post lamp, or fire pit
- Low-voltage cables for landscape lights
It's important to visit www.call811.com to request all underground public utilities be marked before you begin to dig. Private utilities, such as wells, propane lines, and landscape lighting, will need to be found by a private utility locator service.
How Deep is the Frost Line?
The deck footing frost line can vary by feet in the U.S. In warm southern Florida, it might only be one foot deep or less. In Minnesota or Maine, near the Canadian border, it might approach 8 feet. Your local building department can advise you as to the frost-line depth in your city or town. While it may be helpful to reference frost line maps online, remember they are just general guidelines. Always check with your local building department.
It's highly likely you'll have to obtain a building permit to construct a deck. It's quite common for the building inspector to come out and look at the footing holes before you pour the concrete. Ask about this inspection when you apply for your permit.
Footing Size & Layout
Your deck footing layout is critical. Never guess at the size or layout of your deck footings or how many footings you might need.
Deck footing size is a function of:
- Amount of the load bearing down on any given pier
- The strength of the soil
- Proper design of the deck beams and required columns
These factors can only be confirmed once the actual structure of the deck has been determined.
Call to Locate Utilities Before You Dig
It's important to know what is below the surface where your footings will be found before digging. Hitting buried utilities, such as gas or power lines, is extremely dangerous but can also be very costly to repair. A free public utility locator service will help in finding the utilities. They can be reached by calling 811 or online at call811.com. Contact this service 72 hours (about 3 days) prior to when you expect to dig. Private utilities and underground hazards, such as wells, propane tank lines, and landscape lighting may require a private utility locator service to be contacted. Have your deck perimeter clearly marked before utility locator services arrive.
Tools & Materials Needed to Build Deck Footings
The tools and materials you need to build deck footings will vary depending on the soil conditions and the pier design called for by the architect, engineer, or deck planner. In many cases, simple hand tools are all you need to dig the required holes and mix bags of concrete. There are also power tools and machines that can dig much faster.
Round-point shovels are the best tools to cut and dig into the soil. Traditional post-hole diggers are superb for cutting straight down to create a hole for a concrete pier. You may also need a pointed iron digging bar that can be used to crack rocks or chip away at stubborn soil.
You can rent power augers, which are in essence giant drills. These are perfect for sandy soils and clay soils that have small golf-ball-sized rocks. These augers require two people to operate.
Reciprocating saws can be used to cut tree roots. Hammer drills with small spade bits can be used to cut away at tough soil. Hammer drills with chipping bits can also be used to crack larger rocks.
Want to Talk with Trex Professionals?
How to Install Deck Footings
While installing concrete deck post footings is straightforward, there are a few steps to keep in mind.
Step 1: Prepare the Area & Remove Debris
Cut down any brush that's under the deck. All debris must be removed from the area. Nothing should be in the way of you measuring where the footings will be. It's important that the grade of the soil slopes away from the home to promote proper drainage.
Step 2: Dig Footing Holes
This step involves traditional challenging work. Always use the correct tool to dig. Use a round-point shovel to cut into the soil and remove it from the hole. Use a traditional garden spade to slice the side of dense or medium-clay soils, so the walls of the hole are plumb.
Once you're below the frost depth, go a few extra inches and dig slowly. You don't want to loosen the soil beneath where the bottom of the cast or poured concrete will be. If you do disturb the soil, it must be compacted with a tamper or a 6x6 post you lift up and down to pack the soil.
Step 3: Get the Footing Holes Inspected
Per your building department regulations, footing holes must be inspected prior to installing the footers. Allow at least 24 hours for a building department inspector to arrive at your job site. Do not install the footings without passing inspection.
Step 4: Mix and Pour the Concrete
It's easy to mix and pour the concrete. Read the instructions on the bag to know how much water to add. Always use clean potable water if available. Never use muddy water. The concrete, once mixed, should be the consistency of stiff applesauce or mashed potatoes. Do not add so much water such that the concrete resembles a thin, watery gravy. Too much water in the concrete mix weakens it. Dump the concrete into the hole and poke it with the shovel to combine it and fill any void spaces.
Step 5: Add Reinforced Steel as Required
Your architect or structural engineer might call for pieces of steel to be placed in specific locations within the concrete. Follow these instructions to the letter.
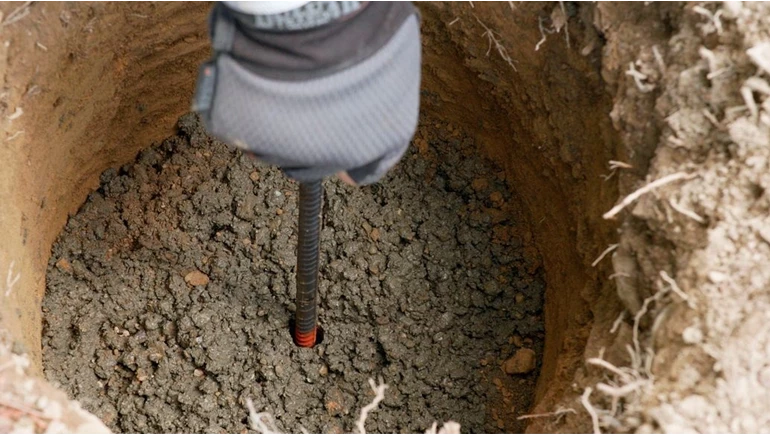
Step 6: Place Anchor Bolts
Once you've smoothed the top of the concrete and shaped it, it forms enough of a dome to shed rainwater, install the 1/2-inch anchor bolt while the concrete is malleable. It's a clever idea to have this anchor bolt primed and painted, so it doesn't rust and corrode over time. You need to place it exactly where it needs to be, so it works with the metal post base you intend to use to connect the wood post column to the concrete pier. Don't assume the bolt goes in the exact middle of the concrete pier.
Keep in mind that the metal post bases you'll use to attach the deck posts to the piers may have anchor-bolt height restrictions. It will be helpful to have your post bases in hand when you pour the concrete so you know how high the anchor bolts must be. You don't want them too low, but you don't want them so high that there aren't enough threads to allow you to tighten the loads.
For more detailed instructions on how to install deck footings, please visit Trex Academy.
Get Started On Your Deck Footings Project
While it may seem intimidating to install concrete deck footings, it's doable with research and diligence. Looking for building support, find a contractor. Taking on the deck building yourself? Find a retailer to secure the supplies you need.